

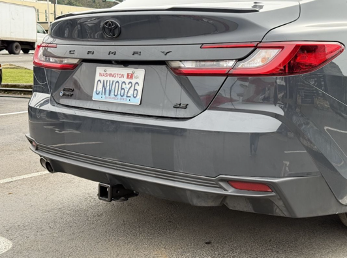
So, you’ve decided to give your 2025 Toyota Camry some extra muscle with the EcoHitch X7482S. Great choice! With a 350 lb tongue weight and 2,000 lb trailer weight capacity, it’s the ultimate undercover hitch—hidden, stealthy, and strong.
And the install? Totally doable. Whether you’re a seasoned gearhead or a weekend warrior with a socket set and a dream, this guide will walk you through the process with step-by-step instructions.
Let’s get wrenchin’.
Before We Begin: Gather Your Parts
There’s a solid list of bolts, washers, nuts, and plate washers involved. Be sure to inventory everything before you begin. If you’re staring at a pile of hardware wondering if you’ve entered a mechanic themed escape room—don’t worry. Everything you need is in the box.
Step 1: Bumper Removal Prep

You’ll be starting this hitch adventure by putting your Camry up on jack stands or a lift. Chock those front wheels and raise the rear. Then:
- Open the trunk and remove those taillight covers.
- Take out the three bolts and gently pull the taillights back. Say goodbye (temporarily) to your lights.
- Unclip the harnesses and stash the lights somewhere safe (no, not the driveway).
Step 2: Underbelly Panel, Be Gone
Next, grab a pry tool and remove the fender clips in the rear wheel wells.
- Pop off all the plastic clips from the underbody panel.
- Undo the plastic screws and 10mm bolt holding on the panel. Use downward pressure while turning the nuts ‘til they’re free.
- Remove the underbelly and set it aside.


Step 3: Lower the Exhaust (Gently Now)
Time to give the exhaust system a breather:
- Support it with a strap or wire just behind the rear wheels.
- Remove the mounting bolts (rear first, then forward).
- Take off the heat shield and the backup speaker nut—let them both hang loose while you work.


Step 4: Remove Bumper and Crossmember
Things are getting real:
- Carefully pull the bumper away starting at the wheel wells. It’ll unsnap like a charm.
- Remove the foam pad, plastic end caps, and those sneaky clips inside the crossmember.
- Finally, remove six bolts and set the crossmember aside. (Don't worry, you’ll see it again soon.)


Step 5: Hitch Install Prep
It’s mod time!
- If needed, open the bottom frame holes just enough to fit an 11/16” plate washer sideways. Be gentle with the grinder.
- Use the provided bolt fisher to thread a 3/8” bolt, lock washer, and plate washer into each side of the frame so they hang downward.


Step 6: Hitch Install Prep – Part II
- Scrape off the seam sealer (a satisfying task, we promise) on both sides where noted.
- Mark and trim a round hole and a rectangle in the heat shield.
- Reinstall that heat shield using the factory nuts. The bolt you fished earlier should now poke through that new round hole like a champ.


Step 7: Hitch Install
Grab a buddy—it’s go time.
- Lift the hitch into place and secure the hanging bolts using flat washers, lock washers, and hex nuts.
- Don’t push the bolts back into the frame or you’ll be fishing again.
- Passenger side: install two M8 bolts with a split lock washer and 1/4” flat washer.
- Driver side: remove the rear exhaust hanger and reinstall it along with an M8 split lock washer and flat washer.
- Torque down that hardware.


Step 8: Hitch Install Continued
Almost there!
- Use a 3/8” drill to widen the upper holes through the rear bulkhead.
- Install the 2-hole plate washer inside the bulkhead.
- Torque hardware to final torque specs:
- 3/8” bolts: 37 Ft Lbs (50Nm)
- 1/2" bolts: 64 Ft Lbs (86Nm)
- M8 bolts: 26 Ft Lbs (36Nm)
- Rehang the exhaust and reinstall the forward mounting bracket.
- Fasten the backup speaker with the supplied 1/4” bolt and flange nut.
- Reinstall the crossmember, foam, and end caps.
Take a breath. This is the home stretch.


Step 9: Bumper Trimming
- Use a body saw to trim the bumper fascia for receiver clearance (refer to the exact dimensions in the diagram).
- Reinstall the bumper and taillights. Your Camry’s starting to look like itself again… but better.

Step 10: Belly Panel Trimming
One last trim and we’re done:
- Trim a clearance slot for the chainplate in the belly panel.
- Trim two additional portions across the back lip—1” down to the corners.
- Reinstall the belly panel and all the hardware you removed back in Step 2.


Boom. You’re Done.
Step back and admire your handiwork. Your 2025 Toyota Camry is now hitch-equipped and ready for action. Whether you're carrying a bike rack or just flexing on your neighbors, the EcoHitch has your back (and your bumper).
Got questions? Our install gurus are always ready at [email protected] or stop by in person—we’d love to see your setup!