


Looking for the best concealed hitch for your Toyota RAV4 that you can install at home—without drilling or trimming? The EcoHitch part number X7396S is engineered specifically for all 2019–2025 Toyota RAV4 models - including Hybrid, and Prime models, delivering a factory‑clean look, excellent ground clearance, and true DIY simplicity. Its angled receiver tucks high for trail and driveway clearance, while the no‑modification mounting protects leased vehicles and preserves resale value. Below, you’ll find fitment, tools, step‑by‑step installation, and real‑world tips—backed by Torklift engineering and our detailed RAV4 installation guidance in the step‑by‑step RAV4 EcoHitch install guide.
Why Choose the Stainless‑Steel EcoHitch for Your RAV4
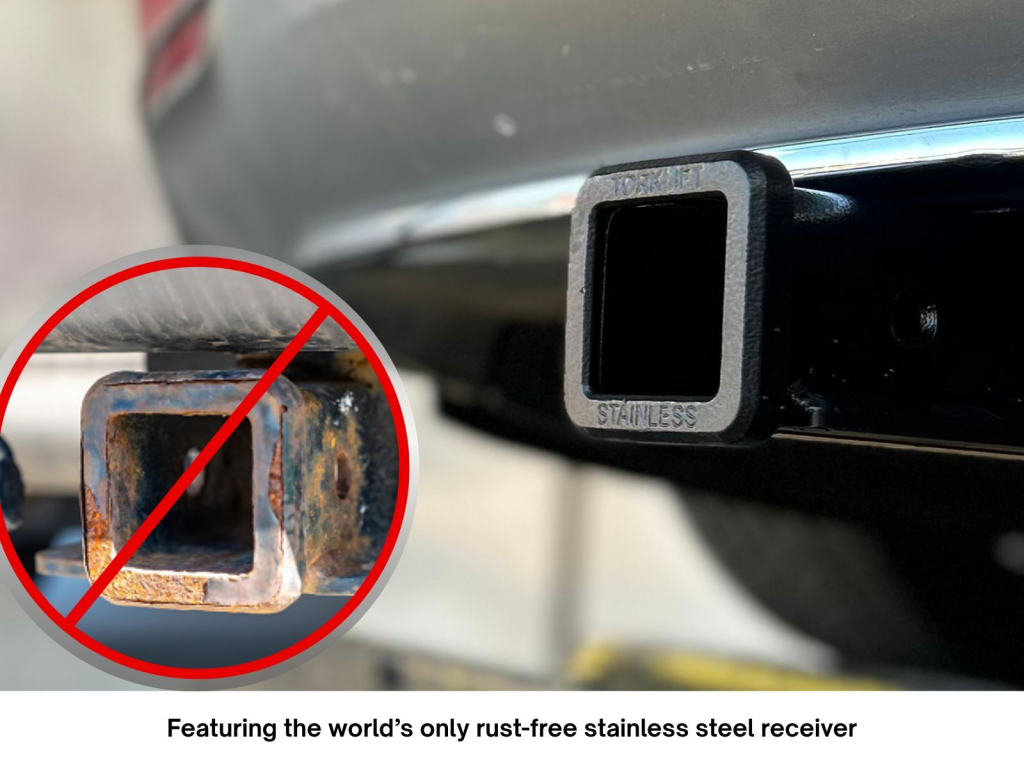
EcoHitch is built to integrate seamlessly with your vehicle’s existing structure for a factory‑style appearance and robust performance. For RAV4 owners, the X7396S is a premium solution featuring a concealed cross tube that keeps your bumper lines clean and your departure angle high. The angled up 2-inch receiver is designed to universally accommodate most hitch accessories—bike racks, cargo, and light trailers—without hanging low or requiring hitch adapters.
If you lease your RAV4, this hitch is an ideal choice. It mounts to factory points without drilling, cutting, or welding, eliminating permanent modifications and lease‑return concerns. And with stainless steel receiver construction, you get exceptional corrosion resistance for year‑round use, even on salted winter roads, as detailed on the EcoHitch X7396S product page.
Compatibility and Fitment with Toyota RAV4 Models
Fitment for 2019 to 2025 RAV4
EcoHitch X7396s is designed for all 2019–2025 Toyota RAV4 models, including standard gas, Hybrid, and plug‑in Prime variants (SE and XSE), as covered in our step‑by‑step RAV4 EcoHitch install guide. It’s compatible with popular trim and package combinations and supports vehicles equipped with hands‑free liftgate sensors.
Benefits for Leased Vehicles: No Drilling or Permanent Modifications
“No‑drill installation” means the hitch uses existing chassis holes, hardware, and access points to mount—no trimming, drilling, or welding of the vehicle. This makes the X7396S perfect for leased RAV4s because installation is fully reversible and minimizes any risk of lease‑return penalties. The fast, plug‑and‑play nature of the hardware and wiring approach is supported by our factory‑fit plug‑and‑play wiring guide, and the hitch can be removed cleanly at the end of your term.
Key Features of the Stainless Steel Receiver
Concealed Design and Factory-Style Integration
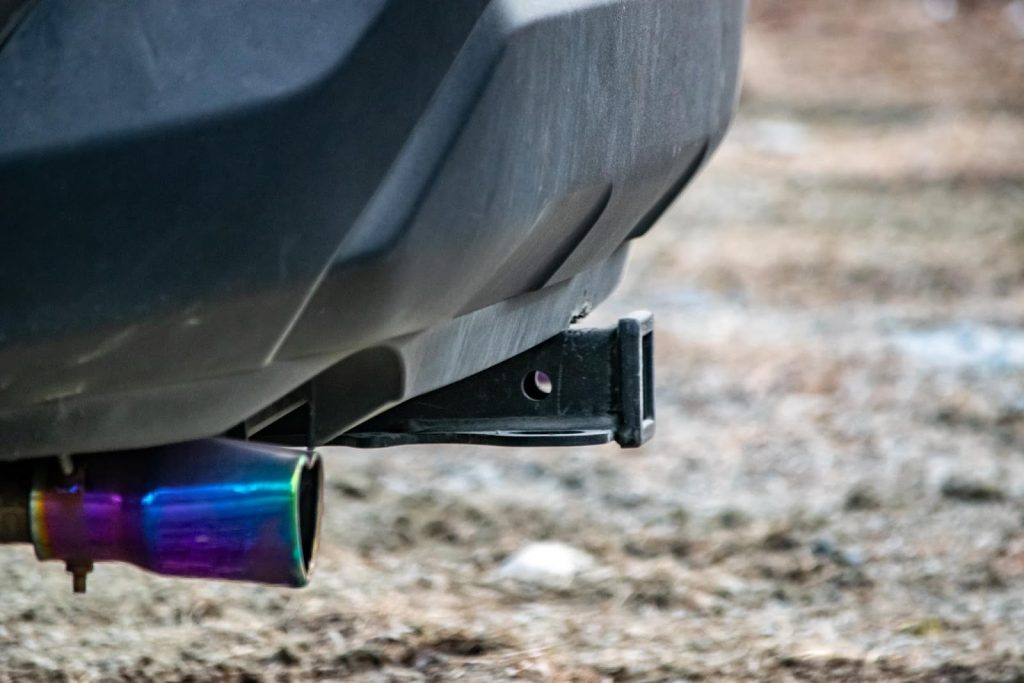
The EcoHitch conceals its main body and cross tube behind the bumper, leaving only the receiver visible for a factory‑like, “hidden hitch” look. This trailer hitch for RAV4 maintains your original styling while adding genuine best in class towing capability capability.
Patent-Pending Stainless Steel Receiver and Rust Resistance
The X7396S version features a patent‑pending, angled stainless‑steel receiver engineered for longevity and structural integrity. Stainless steel is an iron alloy with at least 10.5% chromium, forming a self‑healing oxide layer that resists corrosion and oxidation—ideal for hitches exposed to water, road salt, and debris. USA manufacturing and premium materials give EcoHitch a durability advantage in harsh climates, as outlined on the EcoHitch X7396 product page.
Enhanced Ground Clearance and Hands-Free Liftgate (Kick Sensor) Compatibility

Because the cross tube is tucked behind the bumper, EcoHitch maximizes ground clearance and departure angle—reducing scrapes over driveway aprons and on light trails. The design is also compatible with the RAV4’s hands‑free liftgate. A kick sensor is a motion‑activated system that opens the hatch with a foot wave under the bumper.
Tools and Preparation Needed for Installation
DIY RAV4 trailer hitch installation is straightforward with basic tools. Review the installation manual before you start and stage your hardware.
Installation checklist:
- Park on level ground; engage the parking brake.
- Lay out tools, hardware, and instructions.
- If equipped, unplug/unclip the kick sensor per the guide.
- Protect painted surfaces with fender covers or towels.
- Confirm you have clearance under the rear bumper.
Step-by-Step Installation Process for the EcoHitch on Your RAV4
Is this accurate to the instructions??
Preparing Your Vehicle and Workspace
Work on level pavement with good lighting. Set the parking brake and chock the front wheels. Remove any underbody panels or splash guards that cover the mounting area as noted in the step‑by‑step RAV4 EcoHitch install guide. If equipped, carefully unclip or remove the kick sensor module and set it aside for later repositioning. Mark the bumper centerline to help you square the receiver during final tightening.
Aligning and Securing the EcoHitch to the Frame
Raise the EcoHitch into position and align the side plates with the existing factory holes in the frame rails—no drilling is needed. Insert the supplied M12 bolts with flat and lock washers, then hand‑tighten to hold alignment. Center the receiver with your bumper mark, verify clearances, and torque all fasteners to the specified values using a calibrated torque wrench, as shown in the step‑by‑step RAV4 EcoHitch install guide. Fishwiring is not typically required for this application, streamlining the process.
Finalizing Installation Checks
Refit underbody panels and reinstall or reposition the hands-free liftgate (kick sensor) per instructions. Perform a visual and tactile check: confirm every fastener is torqued, the receiver is centered and level, and there is clearance to the fascia, heat shields, and sensors. Take a short test drive over varied pavement and confirm there are no rattles or contact points.
Installation Tips and Safety Considerations
- Wear safety glasses and gloves; exhaust components and trim edges can be sharp.
- Use plastic trim tools to avoid damaging panels and sensor brackets.
- Support the muffler before removing hangers to prevent stress on joints.
- If you’re not comfortable torquing fasteners or working under a raised vehicle, professional installation is always an option. The EcoHitch’s no‑modification design keeps shop time low.
How the EcoHitch Works with RAV4 Accessories
Compatibility with Bike Racks and Cargo Carriers
The 2-inch receiver fits most popular bike racks, hitch‑mounted cargo carriers, and light‑duty trailers. The angled receiver improves accessory shank clearance and often yields better ground clearance for 2‑bike platforms and compact cargo trays—perfect for daily use and weekend trips.
Preserving Hands-Free Liftgate and Sensor Functionality
EcoHitch’s concealed placement is designed to minimize interference with the hands‑free liftgate. If your sensor is less responsive post‑install, a simple, reversible bracket adjustment or modular relocation typically restores operation without permanent wiring changes, as described in the step‑by‑step RAV4 EcoHitch install guide. The result: factory tech, preserved styling, and added capability.
Maintenance and Longevity of the Stainless‑Steel EcoHitch Receiver
Thanks to stainless‑steel receiver construction on X7396S, upkeep is minimal—no annual paint touch‑ups or rust abatement are typically needed. In snowy or coastal regions, a seasonal rinse to remove salt and road film keeps everything looking new. EcoHitch hitches are backed by a lifetime warranty for added peace of mind; you can explore the broader EcoHitch hitch family for more on materials and coverage.
Ready to upgrade your Toyota RAV4?
The X7396S Toyota RAV4 EcoHitch featuring rust-free stainless steel receiver is available for purchase now!
Frequently Asked Questions
What Toyota RAV4 model years and trims does the EcoHitch fit?
The EcoHitch fits all Toyota RAV4 models from 2019 to 2025, including Hybrid and Prime variants.
Will installing the EcoHitch affect my vehicle’s sensors?
No. EcoHitch is designed to work with RAV4 sensors; at most, a reversible kick‑sensor adjustment may be needed.
What tools and skills are needed for a DIY installation?
Basic hand tools (socket set, torque wrench) and safety gear are sufficient; the EcoHitch uses existing frame points, so no drilling or permanent modifications are required.
Is the EcoHitch suitable for carrying bike racks and light towing?
Yes. The 2-inch receiver is ideal for bike racks, cargo carriers, and small trailers—perfect for everyday utility and weekend adventures.
How does the stainless steel receiver construction prevent rust and corrosion?
Stainless steel forms a protective chromium‑oxide layer that resists corrosion, helping the EcoHitch endure winter salt and year‑round exposure.
IMPORTANT NOTICE:
While EcoHitch®️ trailer hitches are built with high-strength materials and tested for exceptional weight ratings, your vehicle’s factory towing capacities are the ultimate limit. Always refer to your vehicle’s owner’s manual to determine its maximum towing and tongue weight ratings. No aftermarket hitch or accessory can increase your vehicle’s factory-rated towing capacities.
Using hauling accessories like extensions, cargo trays, bike racks, or other accessories that extend the load out from the trailer hitch, will significantly reduce the tongue weight capacity of your hitch system.
To estimate how your setup will affect tongue weight, we recommend using our Maximum Hitch Weight (Tongue Weight) Estimator before hauling your payload (cargo trays, bike racks, etc).
Disclaimer: It is the user’s responsibility to ensure safe towing practices and to confirm that all loads fall within the limits of the lowest-rated component in the towing system. Torklift is not liable for any damage or injury resulting from the misuse or overloading of towing/hauling equipment.