

Unleash Your Subaru Solterra's Potential: A Comprehensive Guide to Installing the EcoHitch for Maximum Adventure. Part Number X6058S
Step right into the automotive dance floor, where your Subaru Solterra EV undergoes a metamorphosis like a boss. In this vehicular tango, we'll guide you through the graceful steps of elevating your ride, liberating bumpers with a precision dance, and indulging in a fender flare fling that's straight out of an automotive drama.
Step 1: Elevate Your Ride Like a Boss
- Start your vehicle transformation by giving it some lift. Chock the front tires and hoist the rear onto ramps or jack stands. If you're feeling extra fancy with a hoist, make Subaru proud by hitting those approved lifting points.
Step 2: Bumper Liberation Tango
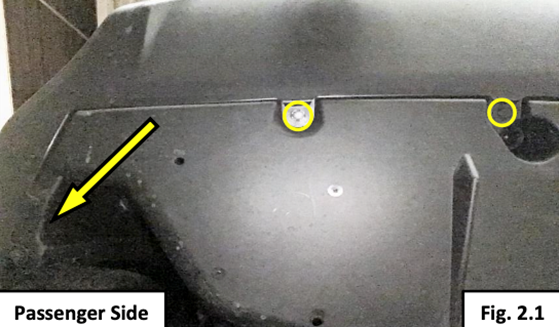
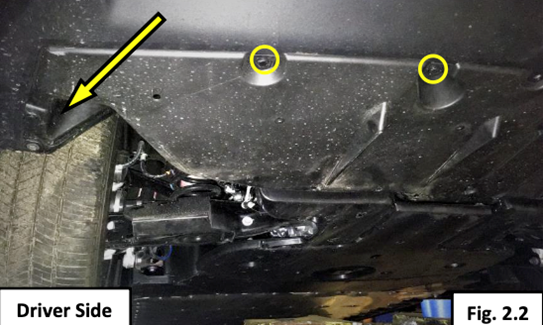
- Channel your inner automotive maestro! Use a small pry tool to serenade out six push-type retainers beneath the bumper (refer to Fig. 2.1 and 2.2).
- Unleash the bolts with yellow arrows, the bumper's secret admirers on either side.(refer to Figure 2.1 and 2.2)
Step 3: Fender Flare Fling
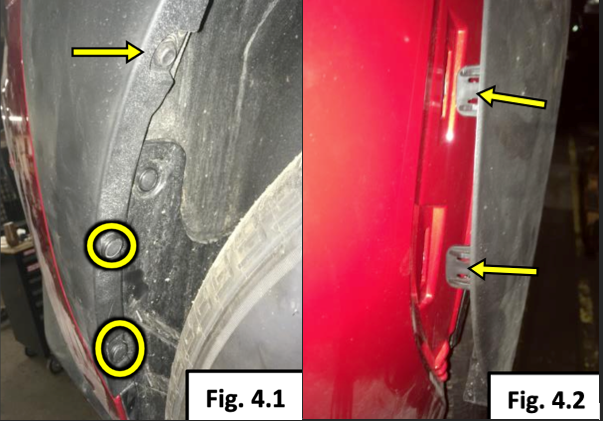
- Prepare for the breakup between the bumper and factory fender flares. There's drama with push-type retainers and a sneaky 10mm retaining bolt inside the rear wheel well (see Fig. 4.1).
- Untab the fender flare from the fender – a move straight out of the automotive tango handbook (Fig. 4.2).
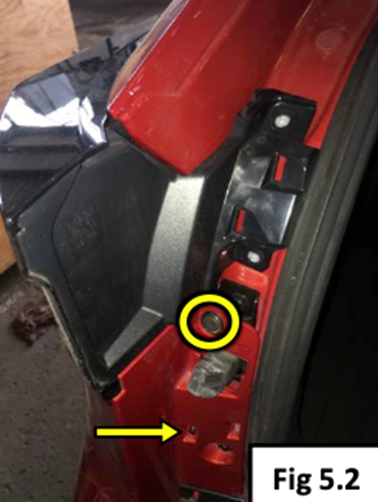
Step 4: Fender Flare Freedom
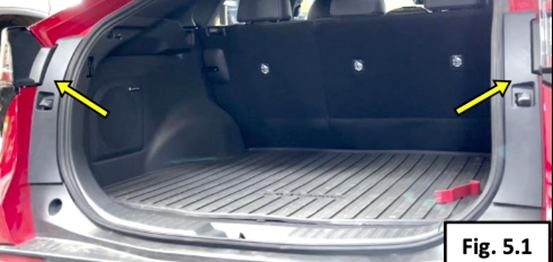
- Time for the grand reveal! Pry away the fender flare, gently pushing in the tabs like a pro. (see Figure 5.1)
- Open the trunk and liberate the tail light. Find a safe spot for your newfound freedom. (see figure 5.2)
- Repeat the performance on the other side for a symphony of vehicular liberation.
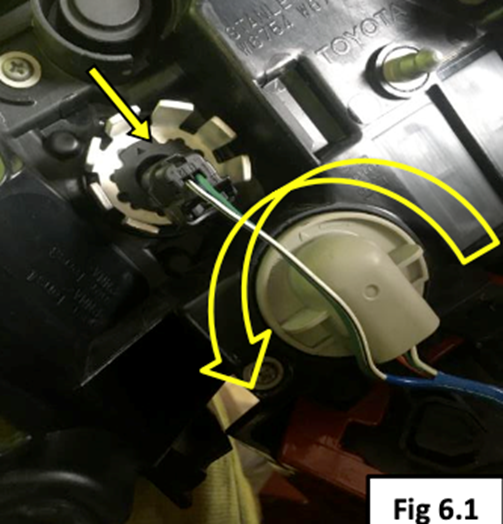
Step 6: Disco for Wiring Disconnect
- Unleash your inner dancer! Unlock the black in-line plug with a small push pin.
- The larger lower cap has has a twist-style locking mechanism – it's a dance-off to reveal a 4-prong pin with a dramatic release (Fig. 6.1).
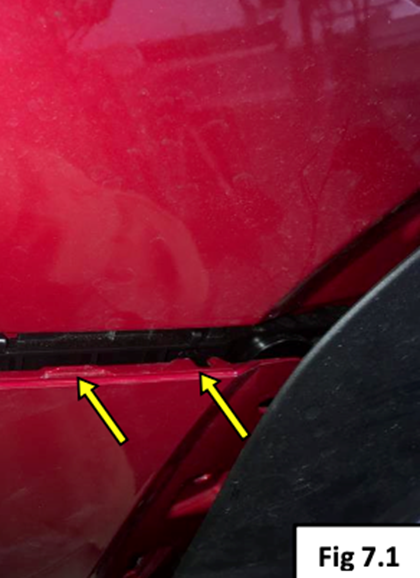
Step 7: Bumper Breakaway
- It's time for the grand exit! Starting from one side, pull the bumper away with flair (Fig. 7.1).
Step 8: Unplug & Unleash
- Unplug the wiring harness like a rock star (Fig. 8.1).

Step 9: Factory Cross Member Farewell
- Bid adieu to the factory cross member. Unbolt and toss it aside – it won't be missed. (see figure 9.1 & 9.2)

Step 10: Hitch Mounting Hoedown
- Grab your cowboy hat! Place washers on M10 bolts, hang the hitch like a saloon sign, and get those bolts partying in the factory mounting holes (Fig. 10.1).
- Once the hitch is square dancing in the center, torque the M10 bolts to 50 ft-lbs.
Step 11: Hitch Receiver Makeover
- Time for a makeover! Mask the hitch receiver area, channel your inner Picasso, and cut off those unwanted sections like a plastic surgeon (Fig. 11.1 & 11.2).


Step 12: Reinstall and Roll Credits
- Reinstall everything in reverse order – it's the grand finale to this vehicular blockbuster.
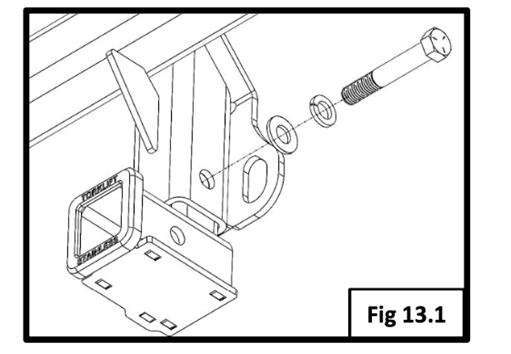
Step 13: Insert Adapter Boogie
- Slide the insert adapter into the receiver hitch – it's the finishing touch!
- Secure it with one 5/8” split lock washer, one 5/8” flat washer, and a 5/8” -11x4” Grade 5 Hex Bolt (see Figure 13.1). Torque it to 112 ft-lbs. and remember to retorque the bolt before each use.
Congratulations, maestro of the asphalt! Your EcoHitch masterpiece is complete – a ballet of bolts, a tango of torque, and a symphony of sustainable style. Hit the road with flair.