

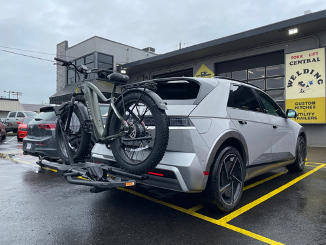
So, you’ve got a 2025 Hyundai IONIQ 5 and dreams of towing? Enter the EcoHitch trailer hitch – part number X7490S. Whether you're hauling bikes to the trail or taking your teardrop trailer on an impromptu getaway, this guide will walk you through the install.
Let’s get into it!
First, Gather Your Supplies (and Maybe a Friend)
Before you wrench, here’s what comes in the box:
- Cross tube, side plates (driver & passenger side)
- A healthy handful of bolts, washers, and nuts
- Detailed instructions for your install
Step 1: Up in the Air
Chock the front tires, then lift the rear of your IONIQ 5 and set it safely on ramps or jack stands. If you’ve got access to a lift, go full pro and use the Hyundai-approved lifting points.
Step 2: Wheel Well Shenanigans
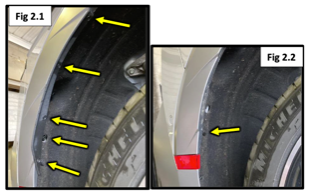
Unscrew the rear fender-felt trim and remove it. There are also clips lurking underneath—evict those, too. Repeat this for both sides like a symmetrical superhero.
Step 3: Bumper Clip Showdown
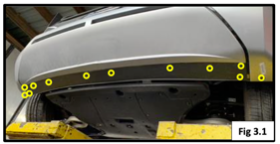
Grab a trim removal tool or a flathead screwdriver and start removing the clips from the bottom of the bumper. Bonus points for not dropping any into the void beneath your garage floor.
Step 4: Taillight Tango
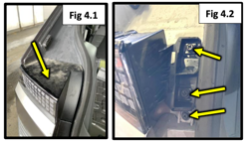
Open the liftgate and pop off the taillight covers using your trim tool. Remove the side screws, then gently pull the taillights straight back and unplug the connectors.
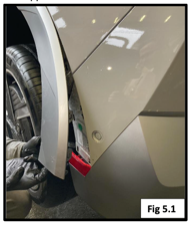
Step 5: Fender Finesse
Unsnap the fender trim slightly past the rear panel. Yes, it’s supposed to sound like that. Repeat on the other side.
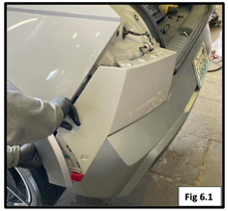
Step 6: Bumper Time
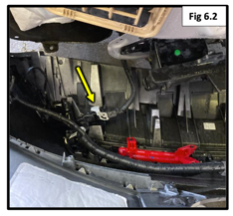
Unclip the bumper, starting from one side and working across until you can reach the wiring harness. It’s a good idea to have a helper here. You hold the bumper, they disconnect the harness. Teamwork makes the hitch work.
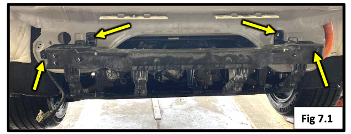
Step 7: Crossmember? Cross It Off
Remove the four bolts holding the rear crossmember and unclip its connector. Set the crossmember aside (nicely—don’t just chuck it).

Step 8: Locate the Mounting Holes
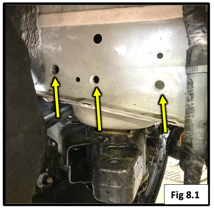
Peek into the frame and locate the factory mounting holes on each side. You’re almost ready to start assembling!
Step 9: Side Plate Installation
Stack a split lock washer and flat washer onto each M12 hex bolt. Using these bolts, mount the side plates on both sides of the vehicle—but don’t tighten them down just yet. Loose is the new tight… for now.
Step 10: Hitch It Up
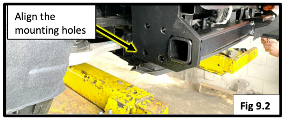
Lift the cross tube into position (muscles or helpers required) and insert the ½” bolts through the side plate holes. Secure with lock washers and nuts. Then:
- Torque the ½” bolts to 64 ft-lbs (86 Nm)
- Torque the M12 bolts to 68 ft-lbs (92 Nm)
Step 11: Make Room for the Receiver
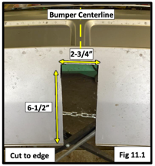
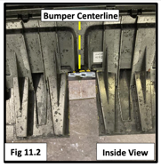
Your bumper needs a tiny makeover to fit around the receiver. Using a body saw (or your cutting method of choice), trim a 6½" x 2¾" rectangle from the centerline. Precision counts—don’t freestyle this.
Step 12: Reassemble the Rear
You’re now the reverse-engineering master:
- Reinstall the crossmember (torque bolts to 18 ft-lbs).
- Reconnect everything and reattach the bumper and taillights.
- Put the wheel well trim back in place.
- Check your brake lights and turn signals.
If everything lights up like a holiday tree—you did it.

Final Words of Hitch Wisdom
You’ve just installed an EcoHitch on your futuristic ride. Go ahead and pat yourself on the back.
And remember: never exceed your vehicle's towing capacity. The hitch may handle 2,500 lbs of trailer weight and 375 lbs of tongue weight, but your car's manual holds the real towing truth.
Questions? Head to torkliftcentral.com or email us at [email protected]. We’re happy to talk torque, towing, or trim clips.