

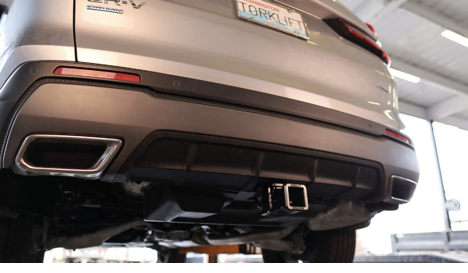
Honda CR-V owners looking to add towing capability without compromising their vehicle's sleek design now have a straightforward solution. Torklift's EcoHitch® delivers a premium, American-made trailer hitch engineered for precision fit and easy installation—no drilling or welding required. This custom-fit approach preserves your CR-V's factory aesthetics while maintaining compatibility with advanced features like hands-free liftgate sensors. With a hidden receiver design and bolt-on installation that most owners can complete in an afternoon, EcoHitch transforms your CR-V's utility without the hassle of traditional aftermarket hitches. Whether you're hauling bikes, cargo carriers, or small trailers, a properly installed no-drill hitch provides the versatility you need with the clean appearance you want.
Prepare for Your Honda CR-V Hitch Installation
Successful hitch installation begins well before you pick up your first tool. Taking time to prepare your workspace and review instructions prevents frustrating mid-project delays and ensures a professional result.
Start by thoroughly reading both your vehicle's owner's manual and the specific hitch installation guide. These documents contain critical information about your CR-V's frame structure, weight limits, and any model-specific considerations. According to installation guidance, reviewing these materials helps you identify potential challenges before they arise.
Clear a level workspace with adequate lighting and room to move around your vehicle comfortably. Gather essential safety equipment including work gloves and safety glasses to protect against sharp edges and debris. If you're working on a driveway or garage floor, consider using a tarp to catch small parts and make cleanup easier. Before starting, watch installation videos specific to your CR-V's year and trim level. Visual walkthroughs build confidence and help you assess whether DIY installation matches your skill level. Many owners find that seeing the process once on video eliminates uncertainty when they encounter each step-in person. Always good to keep your phone with the video instructions under the vehicle with you for reference.
Select No-Drill EcoHitch Trailer Hitch for Your CR-V
A no-drill trailer hitch represents a custom-fit solution engineered to align perfectly with your CR-V's existing factory mounting points. This bolt-on design eliminates the need for drilling new holes or welding, allowing secure installation using only the mounting locations Honda already built into your vehicle's frame. For CR-V owners who lease their vehicles or plan to resell, this non-permanent approach preserves resale value while delivering full towing capability.
Why wouldn’t a hitch manufacturer use the pre-existing holes in the vehicle frame to mount the hitch? Cost! It is easier to design a hitch that can be mounted in the least amount of time by drilling and welding. Not necessarily the most efficient which is a bolt-on application. Drilling holes in the vehicle’s frame is tricky business today. With steel being drawn today more than in the past, micro-fractures are easy to create in the frames. These cracks will grow and rust over time and yet are very difficult to see when they occur. After a few years they will fill with rust and water this is when severe corrosion starts. By using the pre-existing holes in the frame of the vehicle by the manufacturer, this is the best way to preserve the factory engineering of the vehicle.
The EcoHitch stands out with its concealed receiver design that tucks neatly behind the bumper, maintaining your CR-V's clean factory appearance. Unlike exposed hitches that protrude visibly below the rear fascia, this hidden design provides better ground clearance and protects the receiver from road debris and scraping damage. The precision engineering ensures compatibility with factory sensors and electrical systems, a critical consideration for newer CR-V models equipped with advanced driver assistance features. These different features included and designed into the EcoHitch are hidden for the most part and only become important if they are not incorporated in the original design. Specialized powder coat, no-drill design as well as appearance and performance will never be an issue. The hidden details and performance enhancements only become known when the don’t use.
While other brands offer CR-V hitches, many of their designs require excessive cutting or frame modifications to achieve proper fitment. These modifications can compromise your vehicle's appearance and may expose metal components to corrosion over time. A true custom-fit hitch like EcoHitch minimizes trimming while maximizing structural integrity and aesthetic appeal.
When evaluating options, prioritize hitches that specify factory-look integration, maintain sensor compatibility, and include comprehensive installation instructions. The right choice transforms your CR-V's utility without changing its appearance.
Tools and Materials Needed for a Smooth Installation
Having the correct tools ready before you begin prevents frustrating trips to the hardware store mid-project. Here's what you'll need for a professional DIY trailer hitch installation:
| Tool | Purpose | Pro Tip |
| Socket set (10mm–19mm) | Remove panels and tighten hitch bolts | Invest in quality sockets that won't round bolt heads |
| Ratchet with extension | Access recessed mounting points | A flexible extension helps reach awkward angles |
| Torque wrench | Achieve manufacturer-specified tightness | Essential for safety and warranty compliance |
| Jack and jack stands | Safely elevate vehicle for underbody access | Never work under a vehicle supported only by a jack |
| Flathead screwdriver | Remove push pins and trim clips | Wrap tip with tape to prevent scratching painted surfaces |
| Trim removal tool | Pry panels without damage | Plastic tools protect finish better than metal screwdrivers |
| Cutting shears or rotary tool | Trim panels for hitch clearance | Mark cut lines twice, cut once |
| Power drill with file bit | Smooth rough edges after trimming | Prevents sharp edges that could cause injury |
| Painter's tape | Protect surfaces and mark cut lines | Creates clean lines and prevents accidental scratches |
| Telescoping magnet | Retrieve dropped fasteners | Saves time fishing for bolts in tight spaces |
| Safety glasses and work gloves | Protect eyes and hands | Non-negotiable safety equipment |
A torque wrench deserves special emphasis. According to Reddit users who've completed CR-V hitch installations, tightening bolts to the manufacturer's exact specifications—typically between 35 and 75 foot-pounds depending on location—ensures the hitch won't loosen under towing loads. Under-tightening risks dangerous failure; over-tightening can strip threads or crack mounting points. Always read your EcoHitch instruction manual to meet proper torque specifications and re-check your hardware after use.
Step 1: Remove Underbody Panels and Clear Installation Area
Even no-drill installations require removing underbody panels to access factory mounting points. This step creates the workspace you need while preventing accidental damage to plastic components.
Begin by locating the push pins securing the rear underbody panel. Use a flathead screwdriver to pry up the center portion of each push pin, which releases the locking mechanism. Work methodically around the panel, removing each pin and placing them in a container to prevent loss.
Next, use a 10mm socket to remove any nuts or bolts securing the panel edges. Some CR-V trims use a combination of push pins and threaded fasteners, so check your specific model's configuration. As you remove each fastener, note its location—taking a quick photo with your phone provides a helpful reference during reassembly.
Before proceeding, clear away any wiring harnesses or sensor cables in the work area. CR-Vs equipped with hands-free liftgate sensors have delicate wiring that must be routed away from hitch mounting locations. Secure these cables with zip ties or tape to prevent accidental damage during installation.
Step 2: Position the Hitch and Fish Wire Bolts into Frame
Proper hitch alignment ensures structural integrity and prevents installation headaches. This step requires patience and precision, but the result is a rock-solid mounting that will serve you for years.
Start by positioning the hitch assembly under the vehicle, aligning it with the factory mounting points. Most CR-V hitches use the vehicle's tow loop as a centering reference—the hitch should sit symmetrically around this point. Have a helper support the hitch while you verify alignment, or use a jack to hold it in position temporarily.
Fish wire becomes essential when threading carriage bolts through narrow frame channels. This flexible tool allows you to guide bolts from one access hole to another through paths you cannot see or reach directly. Thread the wire through the frame channel first, then attach it to the bolt head using tape or by bending the wire around the bolt. Gently pull the wire to draw the bolt into position.
Helpful tips for using fish wire to fish bolts into vehicle frame:
- Keep the fish wire taut but not overly tight to prevent binding
- Rotate the bolt as you pull to help it navigate bends in the frame channel
- Use a telescoping magnet to retrieve any bolts that slip off the wire
- Start all bolts by hand before tightening any of them
Once all bolts are positioned and started, hand-tighten each one until the hitch sits flush against the frame mounting surfaces. Do not fully tighten bolts yet—final torquing happens after you've confirmed proper fitment and completed any necessary trimming.
Step 3: Trim Panels Carefully for a Perfect Fit Panel trimming allows the hitch receiver to extend through the rear fascia while maintaining a clean, factory-look appearance. While this step requires cutting trimming your vehicle's plastic components, the modifications remain hidden and localized. EcoHitch requires minimal trimming in the lower rear bumper cover to accommodate the receiver tube. Your hitch installation guide will include detailed instructions on how to trim.
Mark your cut lines using a paint pen or marker, then double-check measurements before trimming. The old carpenter's adage applies here: measure twice, cut once. U-Haul's installation guide recommends starting with conservative trimming, then enlarging the opening gradually until the receiver fits with minimal visible gaps.
Use straight-cut shears or a rotary tool with a cutting wheel for smooth, professional results. Shears work well for straight trims in thinner plastic, while a rotary tool provides better control for curves and thicker material. Aftertrimming, use a file bit or sandpaper to smooth rough edges, preventing sharp points that could cause injury or snag clothing.
Before trimming, verify the location of wiring for hands-free liftgate sensors or other electronic features. Route these cables away from cutting areas and secure them temporarily. Modern CR-Vs integrate sophisticated sensors into the rear bumper, and damaging these components can result in expensive repairs and warning lights on your dashboard.
Test-fit the hitch receiver through your trimmed opening before final assembly. The receiver should extend cleanly with no binding or visible stress on the surrounding plastic. If the fit seems tight, make small additional cuts rather than forcing components into place.
Step 4: Secure the Hitch with Provided Hardware
With the hitch positioned and panels trimmed, you're ready to permanently secure the assembly using the manufacturer's hardware. This critical step determines whether your hitch will perform safely under towing loads.
Begin by installing lock washers on each bolt before threading on the nuts. Lock washers create tension that prevents nuts from loosening due to vibration—an essential safety feature for any towing application. Thread each nut by hand first to ensure you haven't cross-threaded the fasteners.
Follow the tightening sequence specified in your hitch instructions. Most manufacturers recommend a star pattern, tightening opposite bolts in succession rather than working around the hitch sequentially. This approach distributes clamping force evenly and prevents the hitch from shifting during installation.
According to discussions among CR-V owners who've completed installations, proper torque specifications are non-negotiable. Under-tightened bolts can work loose during towing, potentially causing catastrophic hitch failure. Over-tightened fasteners risk stripping threads or cracking mounting points in your vehicle's frame.
Use your torque wrench to tighten each bolt to the exact specification listed in your installation instructions—typically between 35 and 75 foot-pounds depending on bolt size and location (check installation guide for exact specifications). Tighten in stages, bringing all bolts to 50% of final torque first, then completing the sequence at full specification. This staged approach ensures even clamping pressure across all mounting points.
Step 5: Reinstall Panels and Double-Check All Fastenings
Careful reassembly ensures your installation looks professional and functions reliably. This final assembly step integrates the hitch seamlessly with your CR-V's underbody.
Begin by reinstalling the underbody panel you removed in Step 1. Align the panel carefully, ensuring it sits flush against the vehicle's underside without gaps or misalignment. Be sure to check that the panel doesn't interfere with the hitch or contact moving components like the exhaust system.
Reinstall push pins by pressing the center portion down after inserting the pin body into its hole. You should hear or feel a click as each pin locks into place. Replace any nuts or bolts you removed, tightening them snugly but not excessively—these fasteners secure lightweight plastic panels, not structural components.
Perform a comprehensive double-check of your entire installation:
- Verify that all hitch mounting bolts remain tight and show no signs of movement
- Confirm that lock washers are properly seated under all nuts
- Check that electrical connections for sensors or lights are secure and properly routed
- Ensure no wiring harnesses contact sharp edges or hot exhaust components
- Test that underbody panels sit flush without rattles or loose sections
Test and Confirm a Safe, Reliable Hitch Installation
Testing your completed installation provides peace of mind and confirms that your hitch will perform safely when you need it. Never skip this critical verification step.
Start with a thorough visual inspection of all mounting points. Look for gaps between the hitch and frame that might indicate improper seating, and verify that all bolts are fully inserted with lock washers visible. Check that the receiver tube extends straight back from the vehicle without any visible angle or twist.
Grasp the hitch receiver firmly and attempt to move it up, down, and side-to-side. A properly installed hitch should show no perceptible movement—any play indicates loose fasteners that must be tightened immediately. This simple shake test reveals installation problems before they become safety hazards.
Verify that all underbody panels and trim pieces are securely fastened and aligned correctly. Crouch behind your CR-V and examine the receiver opening in the bumper cover. The cutout should appear clean and professional, with the receiver centered in the opening and minimal visible gaps.
Test any electronic features that could be affected by installation. If your CR-V has a hands-free liftgate, verify that it opens and closes normally. Check that backup sensors function correctly and that no warning lights illuminate on the dashboard. Modern vehicles integrate multiple sensors into rear bumper assemblies, and proper installation preserves all factory functionality.
Before your first towing trip, double-check torque specifications on all mounting bolts. Some installers recommend re-torquing fasteners after 50–100 miles of driving to account for any initial settling. Keep your torque wrench handy and verify that the paint marks you applied to bolt heads remain aligned, indicating no loosening has occurred.
If you have any doubts about your installation quality, professional installers can perform a quick inspection for peace of mind. A brief professional review costs far less than repairing damage caused by an improperly secured hitch.
Ready to Upgrade Your Honda CR-V? EcoHitch for the Honda CR-V serves as the top contender not only when it comes to ease of installation, but also when it comes to tongue weight capacity, rust-free stainless steel receiver, and best ground clearance on the market. Purchase your Honda CR-V EcoHitch today!
Tips for DIY Installation Success and Avoiding Common Issues
Learning from others' experiences helps you avoid common pitfalls and complete your installation efficiently. These practical tips address the most frequent challenges CR-V owners encounter.
Measure trimming areas twice before making any modifications. Panel trimming is permanent, and trimming too much creates visible gaps that compromise appearance. Start with conservative cuts and test-fit frequently, enlarging openings gradually until the receiver fits properly.
Disconnect the negative battery cable before starting work. Honda's official instructions emphasize this safety step, which prevents accidental short circuits if tools contact electrical components. Reconnect the cable only after completing all installation steps and verifying proper wiring routing.
Watch installation videos specific to your CR-V's year and trim level. Generalized instructions miss model-specific details that can save hours of troubleshooting. Videos show exactly how components should look at each stage, eliminating guesswork.
Recruit a helper for lifting and positioning the hitch. While CR-V hitches aren't excessively heavy, holding them in position while threading bolts requires an extra set of hands. A helper also provides a second perspective for verifying alignment and spotting potential issues.
Keep all hardware organized in labeled containers. Nothing derails an installation faster than searching for a specific bolt among dozens of similar fasteners. Use small cups or magnetic trays to separate hardware by installation step.
Frequently Asked Questions
Is the hitch installation truly bolt-on without welding?
Yes, custom-fit CR-V hitches like EcoHitch are true bolt-on designs that use factory mounting points for secure installation without welding.
Can I install the hitch myself with basic tools?
Most CR-V trailer hitches can be installed at home using standard hand tools when following step-by-step guides and video tutorials.
Will installation affect vehicle features like the liftgate sensor?
Proper wiring routing and careful panel trimming preserve sensor function; EcoHitch is specifically designed for advanced sensor compatibility.
Are minor modifications to fascia or panels necessary?
Minor trimming of plastic underbody panels is typically required for precise fit, but modifications remain hidden and preserve factory aesthetics.
How long does the typical installation take?
Average installation time ranges from 1 to 2.5 hours depending on your experience level and specific hitch model.
Purchase your Honda CR-V EcoHitch today!